0
0
Posted: 16th October 2023 | Author: Adam Brown
Back to news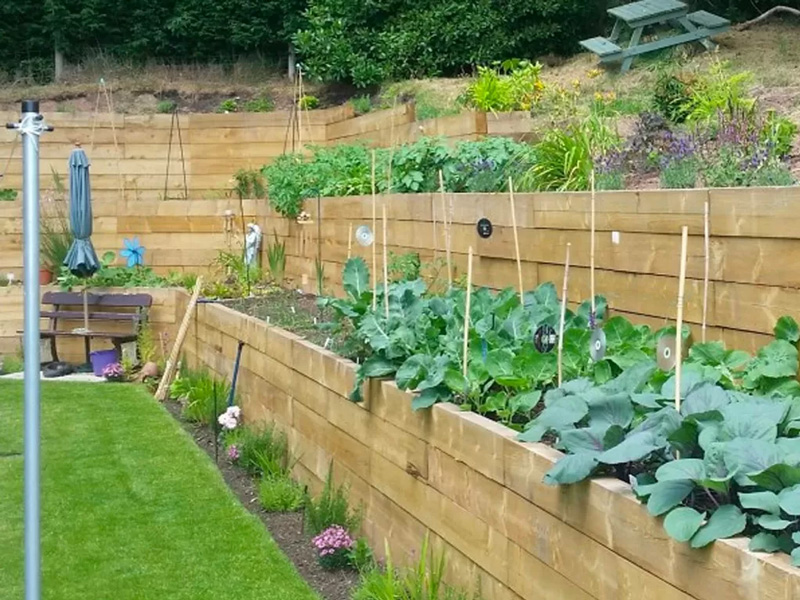
Having a retaining wall built out of sleepers instead of concrete or bricks can make for a simple, more naturalistic alternative that works just as well. This is something that can be done as a DIY project, or with the assistance of expert contractors if you’re not confident doing it yourself. Either way, you’ll need at least two people on hand to get the job done - particularly for lifting and carrying sleepers.
So, let’s take a look at what the job entails.
It’s obvious that you’ll need sleepers in order to build your sleeper retaining wall, and how many you’ll need will depend on the size of the wall. You’ll also need some more tools and supplies to complete this project. These include:
Depending on your preferences, you may wish to stain or paint your sleepers before constructing your retaining wall. If this is the case, look for exterior-grade paint to get the best results, as your sleepers will inescapably have to weather all seasons. If you choose to complete this step, do it at least a week before you get started with the main project in order to give the sleepers plenty of time to dry.
Ideally, you’d do this step before you order your sleepers so you can get a better idea of how many you’ll need. Use string and pegs to mark out the area where you plan to have your wall, and take measurements. At this stage, you’ll need to decide how high your wall will be, as well as considering whether you’ll lay your sleepers horizontally or vertically. If you opt for horizontal laying, you’ll then need to choose between laying them on their wider side or narrower side. All of this will affect how many sleepers you’ll need.
For the purposes of this guide, we’ll be laying our sleepers horizontally on their widest side. This is the easiest way to do it, and makes for a more stable wall without the need for support struts.
Anything that doesn’t need to be in the area to get the job done should now be moved well out of the way to clear yourself enough space to work. You’ll need to dig a trench for your sleepers to sit in - 50mm wider than your sleepers. Remove any turf or weeds in the process, and aim for a level base.
How deep the trench needs to be depends on how tall your wall will be. As a rule of thumb, have one third of your wall in the ground, and two thirds out. Therefore, if your wall will be three sleepers tall laid on their wide side, you’ll need to make your trench deep enough to fit one sleeper in. If you need help with determining how deep your foundations should be, it’s best to consult a structural engineer or someone else in the know to get an expert opinion.
Next, lay your base. We like to use aggregate because it doesn’t require preparation before use and it allows for better natural drainage, but you could use concrete if you prefer. Lay down 20 to 30mm of aggregate or concrete, then check the level again using your spirit level. If you use aggregate, you’ll need to compact it down.
If you’ve opted for a concrete base, bear in mind that it will set in around 24 to 48 hours. For the most stable wall, you’ll want to lay your first layer of sleepers before then, so they can set into the concrete. Concrete bases may be the better choice if you’re building a tall retaining wall, or if the wall will be holding back a considerable amount.
We should point out here that you don’t strictly have to lay a base layer like we’ve described. You can lay your sleepers right on the ground, but that will leave your sleepers more open to water damage and reduce the longevity of your wall.
Now is the time to start putting together your wall. If you’re building a relatively small wall and are using aggregate as a base, you can simply lay your sleepers end to end on the aggregate base. Because it’s dry, you’ll be able to move things around as much as you like before you start to fix things in place.
If you’ve chosen a concrete base, you’ll need to start using your landscaping screws. At each end of the sleeper, drill pilot holes and insert two landscaping screws so that they come out of the bottom of the wide face of the sleeper, into the concrete base. These will give the wall added stability. You’ll need to do this for each of the first layer of sleepers. You may then wish to wait for the concrete to set properly before continuing with the project to ensure the greatest possible stability.
Once your first layer is in place, the next ones are simple. The important thing to remember is to lay out your sleepers in an overlapping pattern, similar to bricks in a wall. This creates a stronger structure to help retain the earth behind the wall. Overlap each sleeper with the one below and use two landscaping screws at each end to fix it to the layer below. Continue until you’ve reached your desired height.
As we’ve mentioned, the one thing that can affect how you should build your retaining wall is how tall it is. One factor to consider in your decision is the restrictions imposed by your local authority. You may need to apply for planning permission or similar licensing in order to build a wall above a certain height.
Another thing to think about is how hard the project will be. The higher the wall, the more complex the project becomes - we recommend getting a structural engineer in for any wall higher than 1 metre. It’s also worth considering hiring contractors to build walls above this height, to be on the safe side. This helps to ensure you end up with the safest, most stable retaining wall possible - as well as one with a touch of expert craftsmanship.
Back to news
The Author: Adam Brown
With a background as a Mechanical Engineer, I started Nationwide Supplies alongside my brother with a vision to modernise what seemed a stuck-in-its-ways industry in the builders merchant sector. Since 2011 it has been my goal to source quality products at the correct prices to be able to offer a saving to customers along with high quality customer service which offers quick delivery and superior technical knowledge in the industry.


