0
0
Posted: 26th September 2023 | Author: Adam Brown
Back to news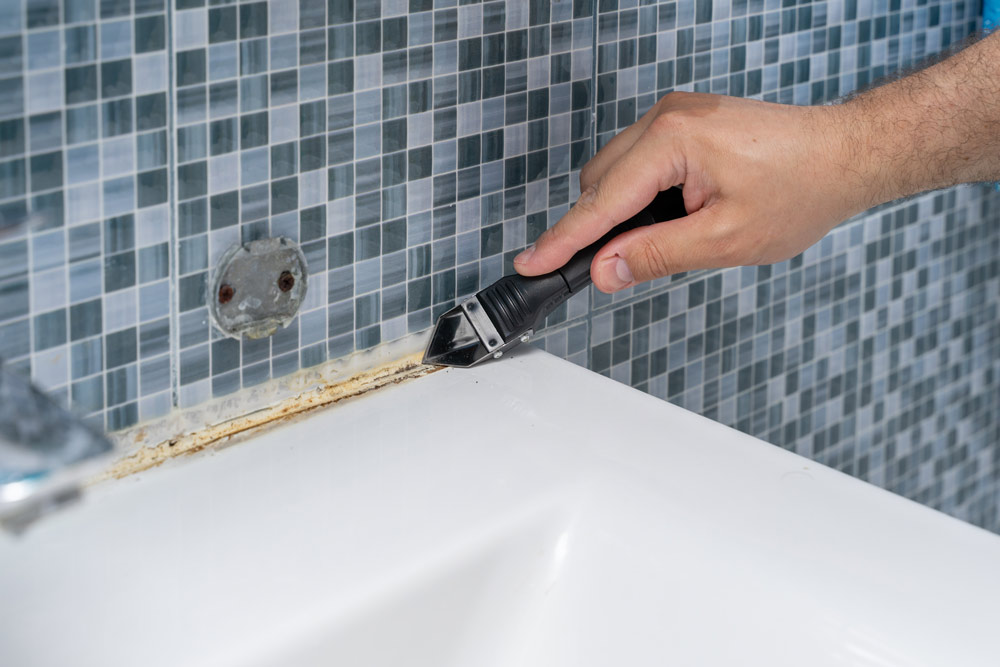
If you’re renovating a kitchen or bathroom, one of the jobs you might need to tackle is removing old silicone sealant. It may be tired, peeling away or ragged at the edges, or perhaps applied in error.
If previous attempts at sealing a bath, shower or sink were a little messy, you’ll need to know how to remove it. This gives you a fresh start for a new application.
Read on for everything you need to know on how to remove silicone sealant properly.
There are a few different ways you can get rid of unwanted or old silicone sealant. Most involve using some sort of specialist sealant remover product. But you can also complete the job using just a Stanley knife and some careful work by hand.
Here’s a step-by-step guide to help you get started:
Step 1: Clean the area
Before you start taking off old sealant, it’s a smart idea to clean the area first. Get rid of any dirt, dust, mould or limescale, using whatever household cleaning products you have to hand.
It’s really important to make sure the area is fully dry before proceeding. And you’ll also want to move any clutter out of the way, to give you a clear space to work.
Step 2: Remove the sealant
As we’ve mentioned, there are a couple of different ways to remove silicone sealant. The first is simply to cut along the length of the sealant with a Stanley knife. You’ll need to be really careful though not to damage the surfaces underneath or either side of the sealant.
Once your line is cut, you can simply peel off the sealant by hand. You can also use a plastic sealant removal tool or scraper to help things along. Bear in mind though that this can be quite time consuming, and some sealant or residue may be left behind.
An easier way to do it is with a specialist silicone sealant removal product. Follow the manufacturer’s instructions to apply this to all of the sealant.
Leave it for around two to three hours (or longer, if recommended on the product instructions) to do its work. The product should soften and dissolve the sealant, making it much easier to peel off. You might still need some kind of removal tool or scraper though.
Step 3: Get rid of the residue
While the step above should get rid of the bulk of the old sealant, there may still be a few bits left. You’ll need to remove this residue before you’ll be able to apply any new sealant.
White spirit on a cleaning cloth or cleaning wipes should do the trick, although you might need to use something more abrasive like a scouring pad on more stubborn patches. Just be careful not to scratch the surfaces of bathroom fittings or tiles.
Once this is done, you’ll need to dry the surface thoroughly and then apply your new sealant. Before you get started, read our handy guide on how to use a sealant gun like an expert.
If the old sealant is in poor condition, it’s best to remove it before applying new sealant. There may be holes or frayed edges that will spoil the look of any new sealant application. You’ll also get a stronger bond if you apply sealant straight to a clean, fresh surface.
However, there are some situations where it’s fine to apply new sealant over old. For example, if the old sealant is smooth, even and in good condition. It might just be too narrow a line, where more cover is needed. Or perhaps you’re changing the colour of a sealant.
The golden rule though is to make sure the surface (and the old sealant) is fully dry before applying the new layer.
Applying new sealant and getting a good finish requires time, skill and a steady hand. The last thing you’d want is to ruin the finish by not waiting long enough for it to dry.
The first place to check for sealant drying times is the back of the tube. Each product is different, and some take longer to dry than others.
Generally speaking, silicone sealant should be touch dry within about an hour. Although this doesn’t mean you should touch it - it’s best to wait a little longer. However, you can very carefully and gently brush away any flecks of dust, dirt or residue. It should be fully cured in around six hours.
But to be on the safe side, it’s recommended to leave it 24 hours before water goes near it. For example, if you’re sealing a shower or bath.
Back to news
The Author: Adam Brown
With a background as a Mechanical Engineer, I started Nationwide Supplies alongside my brother with a vision to modernise what seemed a stuck-in-its-ways industry in the builders merchant sector. Since 2011 it has been my goal to source quality products at the correct prices to be able to offer a saving to customers along with high quality customer service which offers quick delivery and superior technical knowledge in the industry.


